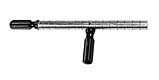
 Lapping
tool (seemingly only available from US). Making your own is easy. One inch steel
bar 15" long, handles nice but not essential.
Lapping
tool (seemingly only available from US). Making your own is easy. One inch steel
bar 15" long, handles nice but not essential.INTRODUCTION
For years I have seldom gone from one shoot to the next without having to adjust my zero. I often wondered what the cause was - cheap scopes I thought. Sometimes on hot days my zero would change during an FT shoot and 2 or 3 shots were missed before I realised what was happening.
I recently purchased an expensive Burris 8-32x R/A scope and I still suffered the problems. I emailed Burris and they recommended lapping my scope rings or buying their Signature rings with floating inserts. www.burrisoptics.com - this is a superb FT scope by the way, pin sharp image and great range finding.
A quick web search using "scope ring lapping" via www.dogpile.com revealed all.
This procedure is well documented and understood in the US but seems to me virtually unknown here in the UK.
The rings on your scope mount are seldom, if ever, (especially cheap mounts as we tend to use) perfectly round or lined up. As a result they cause the scope to distort out of shape and the scope is affected in 2 ways:
The following is largely taken from US sites combined with my own limited experience.
Proceed as I did at your own risk - it worked well for me
SCOPE RING LAPPING (instructions)
Test the rifle with the scope mounted as you want it, pack the mounts as required in order to get the turrets more or less central (optical centre where the scope’s internals and optics function best). Mark the scope’s position with Tipex.
The best packing material is a pop can which are made from very thin aluminium about 0.12mm thick, cut into suitable pieces with scissors (care sharp edges).
Low shots = raise rear mounts
High shots = raise front mount
Shots left = pack front mount on left (vice versa for rear)
Shots right = pack front mount on right (vice versa for rear)
Try the rifle after packing and fine adjust as necessary with extra or less packing.
You can use a calculation to work out how much packing you need
Distance between scope mounts X distance shot off target
Distance to target
Pack for windage or elevation one at a time
Be sure to use the same units, preferably mm
1 inch = 25.4mm
1 yd =36 inches
therefore 30 yds = 30x36x25.4 = 27432 mm
E.g.
If, at 30 yds your shots go 5 inches low and your mounts are 4 inches apart (centre to centre) the calculation would be:
127x101.6 / 27432 = 0.47
So in this case you would try packing four layers under the rear mount
0.47 / 0.12=4
Do not remove the scope rings now you have them set up
The lapping should be done with the mounts on the rifle after setting up/packing etc
Clamp the rifle into a vice with soft wooden clamps, in or out of the stock
Remove the top ring halves and remove the scope
Wrap the gun/stock parts under the rings with paper or old towels
Put course car valve grinding paste into the ring halves - top and bottom
Lapping
tool (seemingly only available from US). Making your own is easy. One inch steel
bar 15" long, handles nice but not essential.
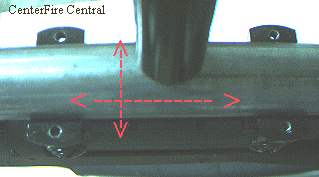
Put the lapping tool centrally into the bottom rings as shown
Very carefully move the steel bar back and forth a couple of minutes
Check progress and when all the black is removed (at least 90%) the job's done
Put the top rings back clamping the lapping tool into the rings but don't clamp too tightly
Rotate the bar until it feels loose then start going back and forth. Keep doing this intermittently tightening the clamping screws – this takes a bit of time
When complete remove the lapping tool and remove the paste from the rings - WD 40 works well
Wash in hot water and Fairy Liquid to remove the WD 40. Allow to dry or use a hair dryer
Now you have a choice, stop there and try gun out over time or continue as follows:
Grease the scope where it contacts with the rings, grease the screws, grease all parts you don't want to stick together
Load Araldite Rapid into the bottom and top rings and clamp down the scope and allow to dry until it gels up. Remove the scope and trim off the excess glue and re-clamp the scope ensuring there is still grease on the contact points - now you see what the grease is for, the Americans sometimes use what they call Gloop (Latex based glue from model shops)
Allow at least 24 hours to dry properly
When mounting and clamping the scope into the glue watch out for the excess oozing out and running into places you don't want it to go
You can buy Burris Signature scope mounts that have floating inserts just for this sort of problem. You can also buy from them off-set inserts
for skewed barrels etc.All Burris stuff can be obtained from this shop and from what I see on this site at very good prices too. http://www.lsbuk.com/lsbburrispage.htm
Memo December 2008 - Steve's link no longer seems to work so I would suggest that you try the Burris UK website.
Remember:
If you re-position your mounts you will need to re-lap them
If you re-pack your mounts you will have to re-lap them
One piece mounts are easier because you do not need to re-lap after packing or re-packing
Never pack inside the rings, always pack between the mounts and rifle mount receiver
Scope ring alignment pointers
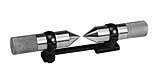 You
can easily make your own but the points must be turned accurately on a lathe.
You
can easily make your own but the points must be turned accurately on a lathe.
The pointers may line-up without lapping, this does not mean lapping is unnecessary
After lapping the pointers should line-up perfectly or very very near
1 mm of scope movement lateral to the sight line = 9 inches at 30 yds, therefore 0.1mm at the scope = 1 inch at 30 yds
Cheap scopes can snag inside even with lapped rings. It is recommended when dialing in, you over shoot the mark and return to the desired setting